The decision to buy a canvas tent was easy. In fact, I had wanted one for years. The tough choices start once you opt for canvas. The first decision is choosing a supplier and settling on a size, then the funs starts with selecting options and choosing optional equipment.
Before tackling this topic, I reached out to Beau White of Deluxe Tents on Vancouver Island and the resident tent expert at Edmonton Tent and Awning. The advice that follows is a combination of their input and my own first-hand and sometimes hard-earned experience to help with the decision to step into a canvas wall tent and to inform the decisions that follow.
Purchasing a canvas tent
Here are some questions to consider before ordering your tent:
- How many people are going to be sleeping in the tent?
- Will a porch extension be needed for firewood storage or cooking area?
- What type of vehicle is being used to transport the tent and gear?
- What type of heat source would be best when in cold climates?
Seek advice from someone who has been a canvas tent camper. One of the guys at Edmonton Tent and Awning has two tents in his personal set-up. Here is his advice:
- Plan for 3.4 square metres (35 square feet) per camper for cot and gear. Add 1.5 square metres (16 square feet) for the stove. If you think at 3 by 3.7 metre (10 by 12-foot) will do it, think seriously about going one size bigger.
- Consider where your tent is manufactured. Warranty work or eventual repairs are easier to get done when your tent manufacturer is local.
- Ensure the material is certified quality canvas.
- Verify fire retardancy.
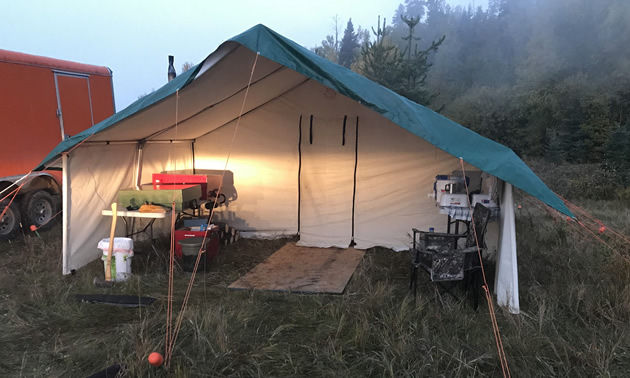
- Order a fly or waterproof tarp to keep rain and snow off the tent and purchase an additional fly or waterproof tarp to be set up to keep the woodpile dry or as an alternate cooking space. A waterproof fly will shed rain and snow, protect your roof from sparks and add some insulation. Using a fly every time you set up will help your tent last long enough to pass on to your kids.
- Add a spark arrestor between the stove and the start of the pipe or at the top of the pipe to keep sparks off your tent and out of the forest or grass.
Pondering your options
There is a myriad of options to mull over when ordering your tent. Here are the main ones:

On days like this, I call a sleep-in day — after all it is my tent. — Photo courtesy Timothy Fowler
- Internal ties for a drying rail to hang gear
- Carry bag for tent, porch and fly
- Additional windows in the back and side walls
- Sod cloth (This is the best alternative to a sewn-in floor.)
- Outside ridge (to be used with a ridge pole set-up)
- Guy ropes
- Porch extensions
- Stove jack options: would a top or side chimney exit work better for your set up? (Consider adding an additional stove jack to the back of the tent for supplemental diesel heat or changing the stove location to the back of the tent if you wish.)
- Wood stove and/or diesel heater
- Water heater and side rack for the wood stove
Porches could be considered a necessity. “The porch serves many purposes,” White said. “They are great for firewood storage and for cooking in. Some people even go as far as creating another room by requesting an end wall with a zippered door to be sewn onto the porch for added comfort while cooking or even extra sleeping space. The most popular option would be a 1.5-metre (five-foot) or three-metre (10-foot) porch extension.”
What about heat?
“Hands down my preferred heat source is the Expedition diesel heater due to the fact that it puts out quick reliable heat,” said White. “Unless you have a stockpile of seasoned wood for a stove, the diesel heater is guaranteed to keep you warm.”
I can attest to the effectiveness of the diesel heater. It was a bit fussy to get dialed in that first season, but it heats the tent to living-room temperatures in -28 C and colder.
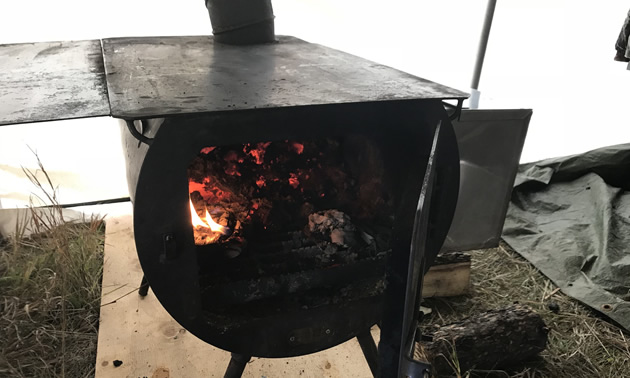
A few lumps of coal to augment cut deadfall for stove fuel means even and reliable heat all night long. — Photo courtesy Timothy Fowler
But I still want a wood stove. The stove is easy to feed cut-and-dried deadfall for cooking and keeping the tent warm during the day, but nothing beats chunks of coal the size of milk cartons to keep the tent cozy overnight. In cold weather, I cook all of the meals on top of the wood stove. For even heat all night long, stoke the stove with coal at 10 p.m. At 6 a.m. there is still enough orange glow to spark up some birch sticks to quickly warm the tent and make coffee and oatmeal.
The base price of my tent now is $3,000 for a 4.3- by 4.9-metre (14- by 16-foot) canvas tent with an internal frame and a three-metre (10-foot) porch. The price nearly doubled once I added stackable bunks, an upsized stove and diesel heater, and another stove jack at the back of the tent.
Oh, and I don’t regret that I own it.
Problems to avoid
Experience is a great teacher. My preference is to learn from others, especially if those lessons involve negative consequences.
Here is a to-do list to avoid the most common tent repairs:
- Dry your tent before rolling it up and putting it away. It’s the most important thing to remember. Make sure your tent is completely dry before rolling up and putting away for the season.
- Use a spark arrestor and cover the roof with a tarp. Roof spark holes are common repairs.
- Carry the tent across asphalt or concrete. If you drag it, the canvas will suffer abrasions and that will eventually weaken the tent.
- Add Irish Spring soap bars or Bounce anti-static dryer sheets where you store your tent to avoid mouse problems.
- Anchor your tent firmly. Go ahead and use all of the anchor points, especially in a potentially windy location.
- Be gentle with eyelets as they tear out with force.
- Be careful not to tear screens in windows and doors
-
Don’t leave food in your tent. Bears account for a lot of repairs.


Comments